

5 Steps to Create Your Dream Squarespace Site
Everything you need to know to streamline your web design process, free, in one place.
There are so many courses out there - so many, ahem, paid courses, so I wanted to help you out by creating a blog post on how to create a Squarespace Website. Hiring a web designer (including yours truly!) is usually a few grand, so if you’re looking to DIY your site, you’re in the right place. I understand the stress behind needing a website, but maybe not having the money or know-how.
But never fear! Building a Squarespace Website is so dang easy, you’ll be shocked that you didn’t do it sooner! Now let’s begin.

Step 1: Understand your Ideal Client & Cater to Them
Before you even sit down and begin the nitty gritty of creating the website, it’s crucial to understand exactly who you are creating your website for. Understanding your ideal client is going to make your web designer wayyyy easier because if you know your ideal client inside and out, you’ll be able to create a site that they will immediately fall in love with, and feel drawn to work with you!
What exactly is an ideal client, though? An ideal client is essentially your dream client - this is the person you would absolutely love to work with. Whenever any business, however large or small, begins, an ideal client is created and understood, because everything you do, will cater to his/her needs and desires. The best part is, you have 100% creativity in creating your ideal client. Get as detailed as you need to, be as creative as you want to, and don’t let your imagination be limited by your personal experiences or what you might think the expectation might be.
This is going to involve answering questions about:
His/Her Basic Information
Understanding His/Her Daily Life
Understanding His/Her Bigger Picture
Understanding Why S/He Has Come to You
You want to understand your ideal client’s pain points, so that you can creative effective products/services that resolve this for them in a way they feel like “I have to work with her!”
Step 2: Answering the Priority Question
This is probably the shortest component of actually creating your website but it’s probably the most important. You must be able to answer the question of
What do I want my website to do?
Is it a place for your clients to review your work? Contact you? Purchase products/services? All of the above?
This is the most important question to understand in order to have clarity behind the purpose of your website - otherwise what’s the point? If you want your website to sell products but you forget the shop page...I mean that kind of goes without saying but it’s easy to get caught up in other aspects of the process when it comes to designing your website. The answer to “What do I want my website to do?” will keep you grounded and on track to creating a site that is effective, efficient, gorgeous, and converting!
Step 3: Organize Your Content
Now that you understand who your ideal client is, how they think, and what they respond to (among a plethora of things!), it’s time to organize everything into one place. As a former web designer, this is where I have run into the most roadblocks with clients. Through my experience, I’ve found that clients tend to be a little scattered in what exactly they want/need on their website, so I actually created a free web design content organizer to resolve this pain point of my clients. This helps them organize their products/services, testimonials, contact info, page descriptions, about section, and more, all in one place.
This is also the point in time where you want to have clarity in your product suite (whether that’s 1 or 10 products/services). When organizing your product suite, be sure to answer these key questions:
What is my product/service?
What pain point does it resolve?
Why does someone need this?
What is included?
What’s the process?
How much does it cost?
Step 4: Browse Around Your Options
Many web design platforms nowadays, including Squarespace include templates to create a much easier design experience for users. In this step of the process I encourage you to browse around the Squarespace template shop to see which one works best for you. Of course you can always start with a blank site too, because amazingly enough, with the release of Squarespace 7.1 (the latest version), all design features are compatible throughout the site.
What exactly does this mean? Basically, on previous versions, templates came in families that specific capabilities (e.g one family was better for blogging, for photography, for shops, etc.), but sometimes certain features, such as a side bar, would not be compatible on other templates/families. Squarespace 7.1’s all-applicable feature is turnkey and huge for designers!
Step 5: Build Your Site
Here we go into the nitty gritty - this is the part where it all comes together! Squarespace has extremely intuitive drag and drop functionality making the design process a breeze.
To begin editing your site:
Click the “Edit” button in the top left corner of the page web page, you’ll see the web page expand into the full screen.

Double-click or click on the blue circle with the plus sign beneath “Add Page Content”

You’ll see a pop up with page section options - browse around and see if there’s something you like pre-created, or you can be like me and simply select “Add Blank + ” and completely design it yourself.

Once you’ve selected your section style, you’ll be brought back to the web page to edit. Here are the important editing elements you need to know:
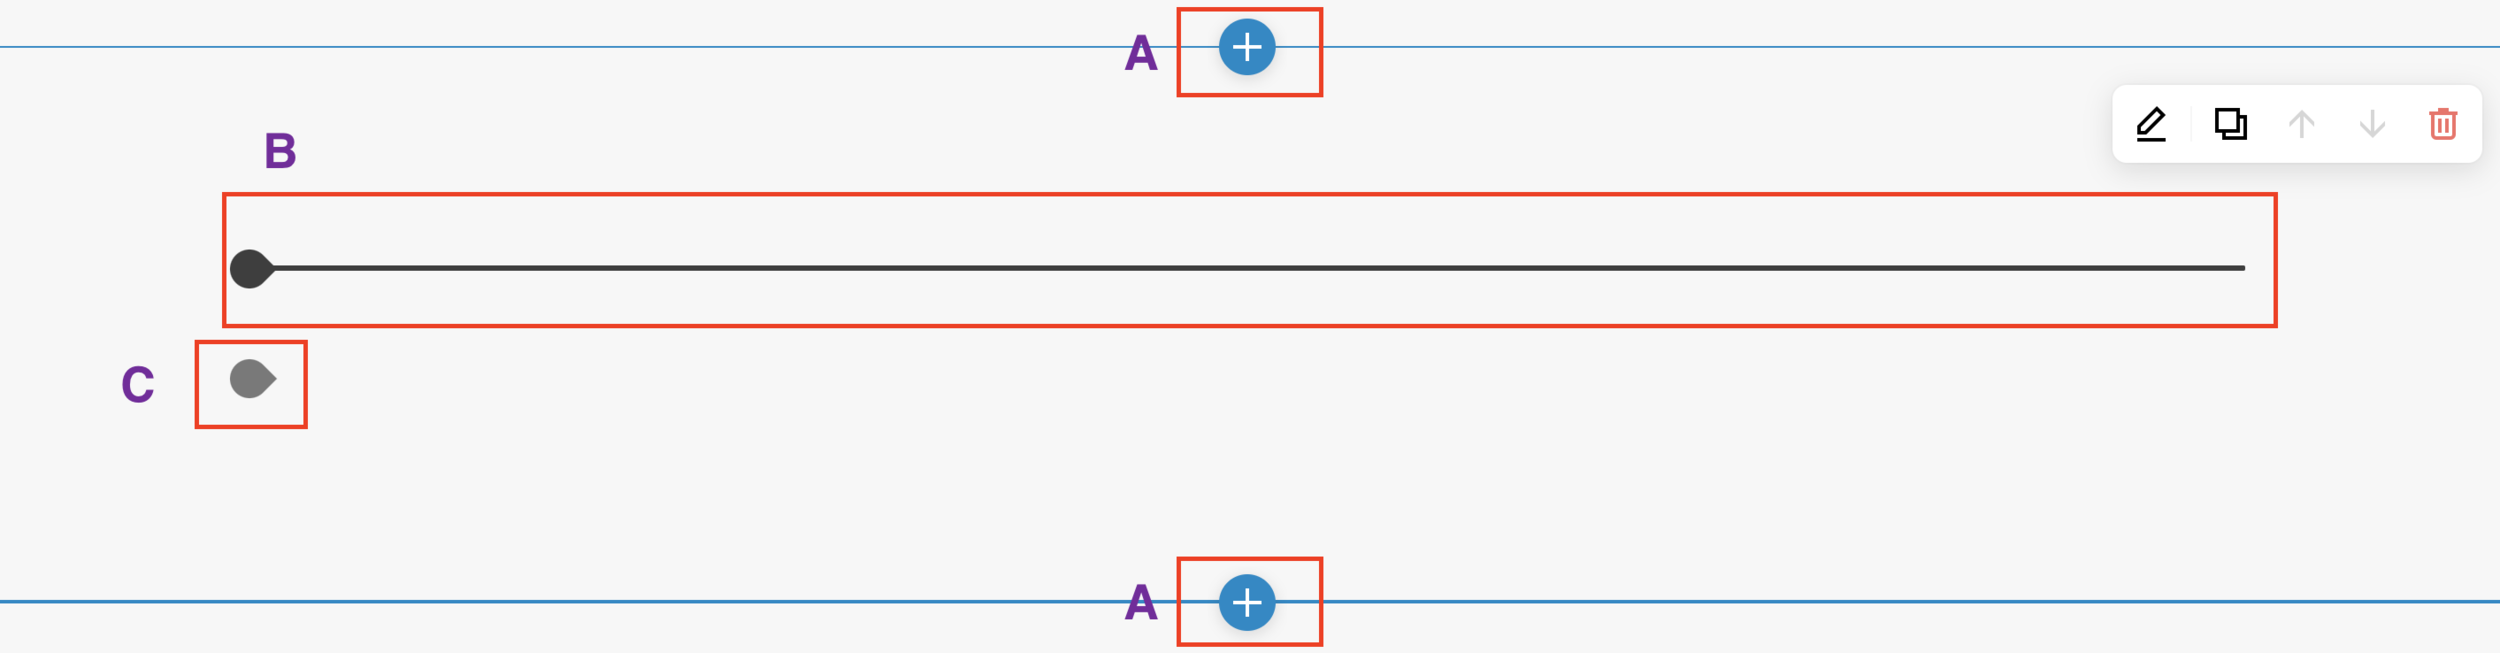
A: Section Add/Removal: Clicking this button will add sections either above or below your current section
B: Reference Bar: When you begin dragging and dropping your content blocks, this darker bar highlights where your content block is going
C: Content Add Button: By clicking on this button, you’ll see a pop up of all your content block options appear. Simply select what you want to add, and arrange using “B” mentioned above.

Et Voila! You’ve built your first Squarespace site!
If you need more detailed help with building your squarespace website, sign up for my free Squarespace email course below by clicking below. We actually go into 10x the depth of this blog post (I mean, I didn’t really want to create an endless blog post - no one would read that!).
Feel free to reach out if you have any other questions regarding web design on Squarespace too!